Monday, May 31, 2010

A Tumble Composter

Several months ago, I saw a smallish tumble composter at the local Costco for just under $100. For those of you who haven’t priced one, that is a pretty good deal. However, with times being tight, I assumed it wasn’t really an option and it was over a week later before I thought to mention it to my wife. To my surprise, she actually thought it was a fantastic idea. I really needed a place nearby to put kitchen scraps and my garden, small though it is, needs a good supply of quality compost, but my attempts to date have not proven the match of the javelinas and my dog. The neighborhood has a wonderful compost bin, but all the proceeds go to the community garden. A tumble composter seemed like the perfect solution. So I rushed out to the store. To my chagrin, they were no longer available.

Over the next week or so, I mourned the missed opportunity and realized just how perfect it would actually be for my situation. Then I started researching other inexpensive compost tumbler options. I happened across one that was made from a 55 gallon plastic barrel. It just so happens that my local Coca-Cola bottler gives those things out when they are done with them, and I had two just sitting there waiting to be made into a pair of rain barrels. I hadn’t really worked out the best way to install them in series, so I hadn’t built the barrels. A few days of planning out the best way to do it and I was off to the store.

I thought of all kinds of complicated, awesome ways to do it, but opted instead for simple. I bought a 1” galvanized steel pipe, a kit to make a clamp-style sawhorse and 2x4s for the legs, a pair of hinges and a pair of latches. I drilled a 1” hole (1 ¼”, actually, I couldn’t find the 1” bit) in the center of the top and the bottom of the barrel and then used a jigsaw to cut a panel out of the side for the door. I installed the hinges and latches and threaded the pipe through the holes. Then I installed the legs to the saw horses and put it all together. The whole project cost me about $50 in materials (the barrel itself was free, after all) and took me about 2 hours start to finish.

Last fall I raked up the leaves at my old house and bagged them up. Not wanting to throw them away, they had been sitting on my back patio waiting for a big enough compost bin. I had to stuff and moisten and stuff some more, but I got them all in, along with the compost from my little previous bin. That was late winter, and the volume has been slowly decreasing, despite a steady stream of kitchen waste and weeds. I have a number of worms that came with the original compost and they have been working diligently on the pile. I’ve been pulling them out as much as I can since the compost will eventually heat up and kill what’s left. So far I have probably harvested a pound or two of worms from the bin and there’s still no shortage.

The point of a tumble composter is to make hot composting easier. A hot compost pile needs to get up to about 150 degrees F to really do its work. In order to do that, it needs a steady supply of oxygen. That is a tall order in a stationary bin. It involves a lot of work turning it. There are all kinds of tricks and tools, but they each have their own limitations and many still require lots of work. With a tumble composter, you just give it a few spins and the pile is fully aerated. The only problem with mine was that between the cold weather this spring and the high carbon content of the pile, it wasn’t heating at all. This weekend that finally changed. I did a little maintenance on the bin last Saturday and found a pocket of heat. Sunday nearly the whole bin was warm. From here on out, all I need to do is spin it every couple of days to keep it oxygenated. In another month or two, I’ll be ready to start using compost. I can’t wait.

Note: The composter currently lacks lateral stability. There is really nothing keeping the pipe in the sawhorse clamps but gravity. A good shove on the side will send it right over. I bought a chain to install in an X pattern between the legs. That will provide the support it needs to not fall over should something happen. I just haven’t gotten it done yet.

Wednesday, May 19, 2010

Chaparral

My home of Prescott, Arizona is a really interesting place. At over a mile high and sporting a hodge-podge of geological features, including at least two extinct volcanoes, mountains and numerous outcroppings of granite boulders, Prescott hosts a number of very different environs. We have Prescott National Forest, a conifer forest comprised mostly of towering ponderosa pines which often reach over a hundred feet tall. We have grasslands that sport herds of pronghorn sometimes a hundred strong. In low areas and around creeks we have lush riparian areas that are home to cottonwood trees that are often more than ten feet wide at the base. Granite Dells is a couple of square miles of bare granite boulders. But one of the most interesting and unique is the chaparral.

Chaparral is dry, scrubby landscape. Trees are more prevalent than on the plains, but certainly not prevalent enough to call it a forest. The most common trees are juniper, pinion pine and various species of oak. Elderly specimens of these trees sometimes reach 30 feet high, but most are shorter than 15 feet. The ground sports a little grass and a few forbs and cactus, but is mostly bare dirt. The most prevalent vegetation in the area is the brush. The chaparral sports a number of tough, woody bushes that often form an impenetrable barrier. Manzanita is the most beautiful, with smooth, glossy, mahogany colored bark. Mountain mahogany and three-leaf sumac with their sour berries are also common. The dominant bush, though, at least in my area, is the scrub oak.

I have always found scrub oak a terribly interesting species. Well, there are actually several species of scrub oak. I grew up back east and am accustomed to the towering, majestic oak trees back there. While scrub oak is certainly a member of the Quercus family, it is virtually unrecognizable as an oak compared to its loftier cousins. About the only familiar feature is the acorns. Instead of deep green, lobed leaves, they have small, gray, thorny leaves. Instead of a single majestic trunk, most bushes have multiple stems that rarely get over a few inches in diameter. A few of the older specimens will grow multiple trunks that get about 10’ high and 4” in diameter. As I mentioned before, there are many different species of oaks native to this area and I am still learning about them. Some grow into something that is clearly a tree while some stay as bushes less than 4’ tall. And, of course, there is everything in between.

As someone who engineers with biology, I am particularly fascinated by the number and biomass of oaks in the chaparral, and most of that biomass is in the form of sticks less that 1” in diameter. Chaparral is also really prone to fires, and oak burns hot. So the local scrub oak is adapted to periodically having all of its above ground vegetation burned off without dying. So you can completely cut the top off of a scrub oak and it’ll just grow back. They grow massive root balls underground and are well adapted to living in really adverse conditions.

As anyone who has tried to grow mushrooms has probably noticed, nearly all of the culinary mushrooms readily available really like to grow on oak. While the chaparral looks really unforgiving to most, I just see all that available oak. To me it just looks like an endless, sustainable source of food. My neighborhood has about 8.5 acres of mostly undisturbed chaparral, with 7.5 acres in one chunk just outside my back door. Some areas of this are unreachable and impassable due to the density of brush. If I harvest just a tiny percentage of this, I could chip it up and keep producing healthy, delicious mushrooms for the rest of my life, all without significantly impacting the scrub oaks.

Monday, May 17, 2010

Shaggy Manes!

As I was walking through the neighborhood yesterday morning, I came across a lovely sight. I found a wild shaggy mane mushroom growing in a landscaped bed. I happen to know that this bed is free of pesticides, so I took the liberty of harvesting the mushroom. A few hundred feet up the road, I found another, larger specimen.

Shaggy manes are prized edible mushrooms that are found in all of the 48 contiguous states. They are also fairly easy to grow as well, but despite their ubiquitous nature, you’ll never find them at your local grocery store. Shaggy manes (Coprinus comatus) have a unique way of dispersing their spores. While most mushrooms open up and let the spores drop into the breeze, shaggy manes deliquesce. In other words, the entirety of the cap of the mushroom dissolves into a gooey, inky mess that is rich in spores. From the ripening (or picking) of the mushroom to completion, this whole process takes about 24 hours or less. They have NO shelf life. You must use them right away. Even freezing them won’t stop it.

One of the reasons shaggy manes are a favorite of mushroom hunters, other than the flavor, is the fact that they are easy to identify. They look like a goose egg on a stick. The surface of the mushroom comes up a little as well, giving them a slightly shaggy texture. While there are many similar looking mushrooms, none of them are poisonous and certainly none are toxic.

I have been trying to grow shaggy manes for years now, with several unsuccessful starts. I think that part of the problem is that the shaggy manes I get online are from the Pacific Northwest, which has a markedly different climate than I have here in northern Arizona. Finding native shaggy manes gives me hope that I can get them to grow here. Fortunately, when I harvested the shaggy manes, I also managed to get a sizable stem butt (the part with dirt on it) with each mushroom. I cut those off and planted them in my containers in the hope that they will leap off and grow into the soil, eventually giving me some shaggy manes of my own. As I mentioned previously, a stem butt is a vigorous lump of mycelial life force. Given the right conditions, such as soil that is rich in organic matter, it may begin growing again and spread, eventually producing more mushrooms. That’s the hope anyway.

As for the mushrooms, they were delicious sautéed in a little butter.

Disclaimer: Collecting and consuming wild mushrooms is risky and should never be attempted without first consulting an expert, and I am certainly not an expert. The risk of eating any wild mushroom rests with the individual and Mad Bioneer does not accept any responsibility for consequences that may arise from the action of anyone eating wild mushrooms.

Thursday, May 13, 2010

Harvesting the Weeds

Most composting instructions tell you not to put weeds in the compost bin, and for good reason. Weeds often have seed heads that won't break down during the composting process unless you are doing some serious hot composting. The resulting compost will inoculate your garden with a lovely infusion of weeds. To make matters worse, the weeds are guaranteed to show up right where you applied the compost, meaning that they have lots of good nutrition to help them grow big and strong.

However, with careful observation and judicious selection, you can select weeds that get quite large before going to seed. As long as you get them before they go to seed, you can collect a nice infusion of green material for your compost.

Here in Arizona we had a really wet winter and early spring. Right now the weeds are plentiful and growing quickly. I particularly favor tumbleweeds for compost fodder as they can get a foot or two tall and nearly as big around before they go to seed. Yes, the cute little critters pictured above will grow up to be tumbleweeds. So around this time of year, and for the next month or so, I like to travel the neighborhood and harvest the weeds, using them to bulk up my compost. In just a few weeks, they break down and really make some lovely black gold for my garden.

Tuesday, May 11, 2010

Diatomaceous Earth – Razor Wire for Your Garden

Lately my compost has been overrun with fruit flies. I have a tumble composter, so I suspect that it will eventually reach a point where it is hot composting (perhaps after the nights stop being so cold) and that will probably burn them off. But in the meantime, it is pretty uncomfortable to even look in there. You get a face full of fruit flies for your trouble. I tried beneficial nematodes, but it’s been almost a month since application and the flies are still a problem. I have thought about spraying neem oil or some other pesticide, but that bothers me from two different angles. The first is that I don’t really like the idea of putting pesticide in my compost, even if the pesticide is organic. The second is that it would kill the adults while it is the larvae that really need killing, so new applications would be needed every few days to have any effect. I also tried sealing up the compost and letting the lack of oxygen kill the fruit flies, but there are too many holes and hinges and such to get a good seal. So I decided to go with physical controls.

A diatom is a type of single-celled algae that is common in all the oceans and has been for millions of years. Diatoms have a unique cell wall that is composed of silica. Interestingly, each species of diatom has unique physiology and can be identified by the shape of the silica “shells” called frustules they leave behind. This knowledge is often used as an easy way to identify the approximate age of marine sediments.

In some areas there are sediments that are composted almost entirely of diatoms, called diatomaceous earth. These sediments are easily crumbled into a fine white powder and sold at garden centers everywhere. When diatomaceous earth is applied to the garden, those microscopic spikes form a sort of razor wire over your soil. When insects walk over them, they produce tiny cuts in the insect’s exoskeleton, which allows the insect’s bodily fluids to leak out, leading to dehydration and death. When applied to compost, it should kill the fruit fly larvae and might kill adults as well. When applied to the garden, it will kill a number of different pest species, especially ones who drag their bellies on the ground. Eventually, the silica breaks down and is incorporated into the soil. It is worth mentioning that it doesn’t seem to have any deleterious effect on humans or larger animals, including earthworms, as our skin is too thick to be cut by the tiny spines. I have also heard that they make a medical grade diatomaceous earth that you can swallow to kill intestinal parasites.

Thursday, May 6, 2010

Caring For Your Mushroom Log


Okay, let’s say that you have followed my directions from previous posts and you selected the mushroom you wanted to grow and started growing a mushroom log. How do you take care of it? If you live in a humid climate that gets regular rain, that is actually pretty easy. Just put it on the north side of your house where it can catch the rain and rarely gets direct sun. Also, limit exposure to the ground to help keep out the bugs and other forms of contamination. Leaning it against the house or stacking on some cinder blocks works well for this.

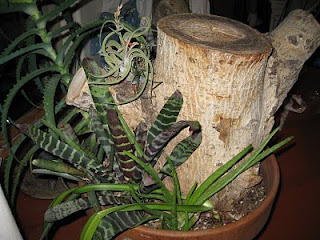
If, like me, you live in an arid climate, or you want to keep the log inside, things get a little more tricky. You still want to protect the logs from the sun as much as you can, but you now have the added difficulty of keeping them wet normally. The first method is probably the easiest and works for all mushrooms that are happy growing from vertical surfaces. Get a pot that is slightly larger than the log and as tall as a third to a half of the log. Put in the log and fill it with either pasteurized wood chips or sand. Wood chips will give the log a little more nutrition, but you’ll have to inoculate them as well. I have actually inoculated the chips and let them inoculate the log and it has worked pretty well. From there, you just water the pot, pretty much like you would water a plant. Actually, more like you would water a cactus. Since the mushrooms are growing inside the log and have no leaves, they lose much less water to evaporation than plants. So watering them once a month or so is plenty. Another consideration is whether the pot has a drain in it or not. If you do have a drain, it can be difficult to get enough of the water to soak into the log. If you don’t have a drain, the water in the bottom can stagnate and get smelly. Personally, I prefer no drain, but I have done it both ways successfully.

If you want to up the stakes a little, you can make an ecosystem out of it. Once the mushrooms have had a month or two to work, I like to add a handful of worms to the wood chips and a few plants. The worms will break the wood chips down into a rich compost, which helps the plants grow. The plants will help pull water out of the bottom of the pot. They also make a nice indicator. If the plant is wilted, your mushroom probably also needs water. The plant and mushroom are also complimentary on gasses produced. The mushroom produces a slow, steady stream of carbon dioxide as it breaks down the log, which provides a perfect source of food for the plant. The plant provides a slow, steady supply of oxygen, which is perfect for the mushroom. It all makes for a lovely harmonious system, just like nature intended.

Another way of taking care of your log is to just mist it regularly. A regular, thorough misting will soak into the log and help keep it hydrated. Again, I tend to use plants to help with this process. Epiphytes are plants whose roots prefer to never touch soil, instead living up in trees. They aren’t parasites, though. They get all of their moisture from humidity and rain (or regular mistings in the home) and all of their nutrients come from the air. I particularly like epiphytes in the home because I figure (don’t really have any evidence, but it makes sense to me) that if they get all their nutrients from the air, they are probably pretty good at pulling all kinds of noxious gasses from the air. Most kinds of orchids, most kinds of bromeliads (especially tillandsias), and several kinds of ferns are all epiphytes. You can either glue them to your mushroom log or tie them down with wire. Since both orchids and bromeliads have beautiful flowers and often have wonderful forms, they actually make lovely arrangements, especially if you picked a log with branches to nestle the plants in. By regularly misting your plants, you are also regularly misting the log.

So, to recap, the only hard part about caring for a mushroom log is keeping it watered, but not too soggy. It really won’t have any visible signs of life, so you just need to remember to keep it happy until it is ready to produce fruit. I’ll talk about fruiting your log soon.

Monday, May 3, 2010

Cleaning Oil Spills with Hair and Mushrooms

As you may have noticed by now, this blog is about using natural systems and organisms to solve human problems. As you may have also noticed, Paul Stamets is my hero, mostly because he has shown great creativity in doing just that. Well, he’s at it again. Human hair has an incredible affinity for oil. It naturally soaks up the oil our skin produces. It also works very well for soaking up crude oil like you would find in an oil spill. It is also an abundant waste product and is produced in great abundance at barber shops across the country. So various people have been working with those barber shops to collect hair and make it into mats that can be used to clean up oil spills.

But then what do you do with them? That’s where Stamets comes in. He has “trained” a strain of oyster mushrooms to metabolize crude oil. Yes, that’s right, it just eats crude. And when it is done, the area is clean and safe. They are pretty sure you could even eat the mushrooms produced, though I doubt anyone is in a rush to try it out. Well, it also turns out that oyster mushrooms are also quite fond of digesting hair. Stamets and his team can take the oil-soaked hair mats and grow oyster mushrooms on them, with the end result being compost that is safe for use in your garden. I love elegant solutions like this. We need more solutions like these.

For more information, check out these articles: